
Last updated on July 6th, 2024 at 12:37 pm
You are in the right place if you want to learn how to read knitting charts!
Mastering the art of deciphering and knitting based on these visual diagrams is a fundamental skill for any knitter.
Knitting charts serve as graphical depictions of knitting instructions.
I’m a dedicated enthusiast of knitting charts. I often find it challenging to follow written knitting instructions. I believe this guide will enhance your knitting productivity.
Mastering this skill will empower you to customize patterns to your liking effortlessly.
Despite their initial appearance of complexity, knitting charts are an invaluable skill worth conquering.
Please note that some of the links on this blog are affiliate links, and I may earn a small commission if you purchase products through them. Your support through these links helps sustain this blog and is sincerely appreciated.
Advantages of Reading Knitting Charts
- The written patterns are not always convenient. Especially if these are complex patterns, the description of which will make up an enormous amount of text.
- Written patterns are difficult to convert for knitting in the round. Knitting charts are easy to manipulate for round knitting.
- Knitting legends are easily and quickly remembered so that after the first repeat (rapport) you will easily continue without looking at the chart.
People can use charts not even knowing foreign languages.
Convenience in work.
- Visually, you can see how pattern should look, how yarn overs are placed, or cables twisted.
Therefore, it would be nice to keep the tables of legends always in front of your eyes.
But if you are new to knitting, then how can you read and understand these charts?
Chart comprises cells, like a table (or grid), and each cell denotes one stitch.
You can immediately calculate the stitches necessary for the set from a row. The vertical cells are the number of rows of the pattern.
Knitting Chart Reading Directions
In flat knitting, you read the charts in the same direction as you knit.
Therefore, when you read the knitting scheme, start is from its lower right corner. The first row reads from right to left (←) and knit according to the scheme from right to left (if, of course, you knit with your right working hand.
In most cases, the first row is the front row or right side (RS).
In knitting charts, odd numbers (1,3,5,7,9 etc.) are right side of the knitting (front rows).
After you have finished knitting the first row, you turn the work on the wrong side to start the second row. And this time you will read the diagram on the second, wrong side (WS), from left to right (→), and also knit stitches in the order shown in the diagram.
On the wrong side, even numbers (2, 4, 6, 8, 10 etc.) are showing you the back side of the work (WS).

In the picture 1. you can see simple stockinette chart pattern. One knit stitch has two sides – right side (‘V’ pattern) and backside (‘-’ bar). Stockinette stitch is classic knitting pattern. The wrong side is reverse stockinette stitch
Once you know how to do knit and purl stitches, this is the one to start with. In flat knitting you knit right side (RS) and purl wrong side (WS).
In this chart knit stitch is an empty cell. Often, in the other charts the knit stitch is showed as a vertical stick (‘|‘).
One more thing to know. Charts do not display edge stitches. How to understand if there are edges on the chart? If there are any, you will definitely see them in the symbols for the scheme.
If you would have written pattern to this chart, it would look similar to this:
Cast on 10 + 2 edge stitches.
- Row. Slip 1 stitch knit-wise, Knit 10, Purl 1 stitch. Turn.
- Row. Slip 1 stitch knit-wise, Purl 10, Purl 1 stitch. Turn.
Repeat rows 1-2 four more times.

Garter stitch is another easy 2 row repeat knitting pattern where you alternate knit and purl rows.
Look closer at the legends on the bottom. It tells you to knit on the right side (RS) and knit on the wrong side (WS). Basically, you are always knitting each row.
Written pattern for Garter stitch
Cast on 10 + 2 edge stitches.
Row. Slip 1 stitch knit-wise, Knit 10, Purl 1 stitch. Turn.
Row. Slip 1 stitch knit-wise, Knit 10, Purl 1 stitch. Turn.
Repeat rows 1-2 four more times.
What is a pattern repeat (rapport) in knitting?
Another concept that you need to learn is the rapport of the pattern. Rapport is a repeating part of the pattern.
If you knit an ordinary stockinette, you will not encounter the concept of pattern repeats aka rapport. For complex patterns, knowing meaning and determine repeat is very important.
You can see a red border around stitches – that shows pattern repeat.

In order to avoid writing same repeated instructions again and again, the asterisks or brackets in written instructions show what stitch combination need to be repeated to the end of the row. Same counts when you see ‘work in pattern’.
In the knitting charts, they enclose repeated stitches in some kind of border or arrows.
To make Garter stitch (picture 2) you repeat 2 rows.
Repeats are like building blocks.
How do you keep track of rows in knitting patterns?
I offer you several options on how to keep track of rows in knitting:
- Print out the chart and use a highlight pen to mark which row is done.
- Use row counter
- Move a paper clip
- Use a ruler
- Make marks on the paper – old school method 🙂
- On the laptop – computer’s inbuilt features
- On the Mobile – special row counting software
- Use something accountable – for example, beads and put in a bowl after finished row.
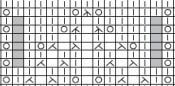
Lace Pattern Chart
Let’s look at another example – lace chart pattern. Here you can see 12 stitch and 16 row repeat in the red square.
Tip. Use stitch markers to separate each repeat.

How to read a knitting charts no stitch (what does grey cell mean in knitting)?
Sometimes you can see an empty or gray square on the diagram. This is how pattern makers describe the term “no stitch”. Because the number of yarn overs (YO) and stitches connected in a row do not correspond to each other.
This means that the number of stitches in this row reduced by 1, but in order for the diagram to remain smooth, undistorted, the missing stitch makers describe as an empty square. It is necessary to knit this row without paying attention to this square.
Do not worry, at the end stitch count will not change.
Convert Knitting Chart to Written Instructions PDF – Knitting Instructions Explained
At the beginning, converting charts to written instructions is a good learning curve. Follow simple rules.
Get familiar with knitting chart symbols – every maker might have their own symbols describing same stitch.
Get pen and paper (or laptop), strictly follow every square and row of the chart.
Write every step.
I have written swatch instructions for knitting chart. It comes from a fabulous book – Japanese Knitting Stitch Bible: 260 Exquisite Designs by Hitomi Shida.
Knitting Chart nr. 54. Repeat = 22 stitches and 40 rows.
In the written pattern pdf file you will get:
- Lace and cable knitting chart
- Swatch picture
- Repeat (rapport) showed
- Symbols explained
- Written pattern to the chart
This is everything to get familiar with reading knitting charts. You can start knitting swatch immediately following each row.
Knitting Chart Showing Only Odd Rows
You will see knitting charts showing only odd rows (1,3,5 etc.) – meaning only RS rows often to simplify the understanding of the chart.
If you see a chart like that, it shows how the Right Side should look. There are 2 options on how to knit Wrong Side (WS) row:
Purl all the wrong side rows (you will see all purl stitches in front of you)
Follow the pattern on the WS – If you see knit stitch in front of you – knit it, or if it a purl stitch – purl it.
Next cable knitting chart is an example of showing only odd rows.
Cable Chart Pattern Reading

6 stitch cable pattern. You have to cast on 25 stitches (23 and 2 stitches for edge). Edge stitches not involved in written instructions.
- RS. P2, K6, P2, K1, P1, K1, P2i K1, P2, K6. Turn
- WS. P6, K2, P1, K1, P1, K1, P1, K2, P6, K2. Turn
- RS. P2, K6, P2, K1, P1, K1, P2, K1, P2, K6. Turn
- WS. P6, K2, P1, K1, P1, K1, P1, K2, P6, K2. Turn
- RS. P2, (Place 3 sts on CN, hold to front, K3; K3 from CN), P2, K1, P1, K1, P2, K1, P2, (Place 3 sts on CN, hold to back, K3; K3 from CN). Turn.
- WS. P6, K2, P1, K1, P1, K1, P1, K2, P6, K2. Turn. (This row doesn’t belong to the repeat, but you need knitting it to start the repeat again from row 1).
As cable chart shows only odd row numbers, you need to figure out how to knit on the wrong side. As you can see, we have cable, purl and knit stitch combination showed on the right side.
We usually purl cable stitches on the wrong side. If next stitch on the needle is facing as purl – purl it, if facing as knit stitch – knit.
How to Read Knitting Charts in the Round
Reading knitting charts in the round is easier, because you don’t need to figure out what is happening on the wrong side – you simply do not have the wrong side. You are knitting on the right side all the time!
Knitting is always from right to left (←). In the description, it would say Round 1 instead of Row 1. Usually, in the chart round (row) numbers are only on the right side.
In flat knitting, charts show also extra stitches for symmetry from both sides. In the round knitting – ignore them and knit only repeat itself.
Lace Knitting Chart

Written Instructions
You will need 3 stitch markers to separate each repeat. Cast on 30 stitches and close in the round.
Round 1. *K1, YO, K3, CDD, K3, YO. Place Stitch Marker*. Repeat from * 2 more times.
Round 2. K30;
Round 3. *K2, YO, K2, CDD, K2, YO, K1* Repeat from * 2 more times.
Round 4. K30;
Round 5. *K3, YO, K1, CDD, K1, YO, K2* Repeat from * 2 more times.
Round 6. K30;
Round 7. *K4, YO, CDD, YO, K3* Repeat from * 2 more times.
Round 8. K30;
Round 9. P30;
Round 10. K30; Fasten Off.
You can do as many repeats as needed.
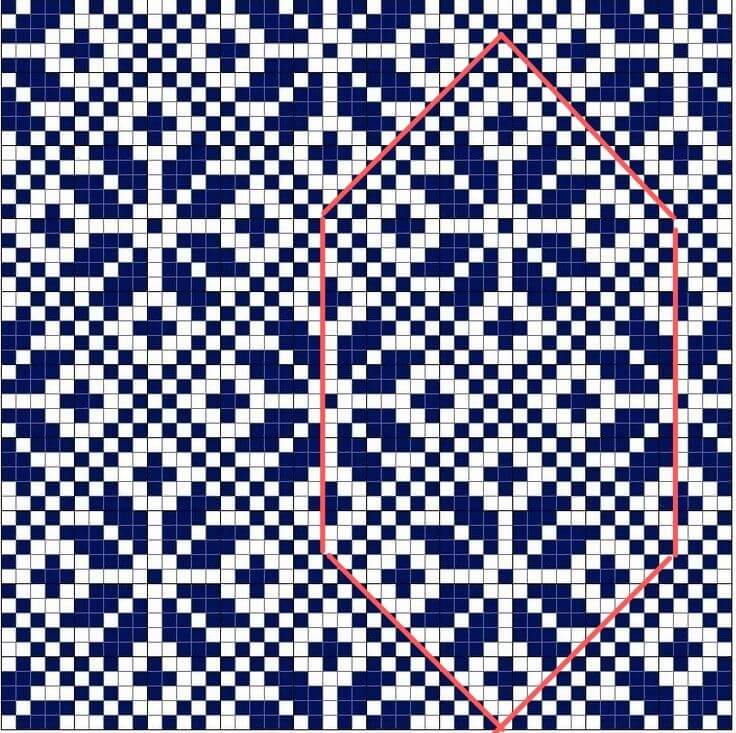
How Do You Read a Fair Isle (Stranded) Knitting Chart?
Reading color pattern charts combines all the rules mentioned above. Stranded or Fair-isle knitting involves two or more colors worked in 1 row. Most fair-isle (stranded) knitting you work in stockinette. Each small square is 1 stitch. Remember,
If you knit flat: On the Right Side row – knit the pattern, and on Wrong Side rows – purl.
If you are knitting in the round, knit all the time. Always work the chart from right to left (←).
What you see in the chart is what you get when knitted. It shows all the rows – odd and even.
Remember that knit stitches are wider than they are tall; If you want to make your own color chart, you need to make the cells approximately half again as wide as they are tall in order to get the picture right and not distorted.
Conclusion
Have confidence; this skill will undoubtedly develop soon. We begin, as usual, with the basics, and with patience and dedication, you will gradually attain proficiency and speed in reading knitting charts.
Adapting to different knitting symbols may require some time. Fortunately, every pattern usually includes a symbol key section.
In this guide, I’ve introduced you to various techniques on how to read knitting charts.
Access the free PDF (linked above) with written instructions for a knitting chart, making advanced charts easier to understand.
Access the free PDF (linked above) with written instructions for a knitting chart, making advanced charts easier to understand.
Thank you for staying with me until the end. Keep an eye out for more valuable tutorials!
Reach out if you have any suggestions or questions. I’m here to help!