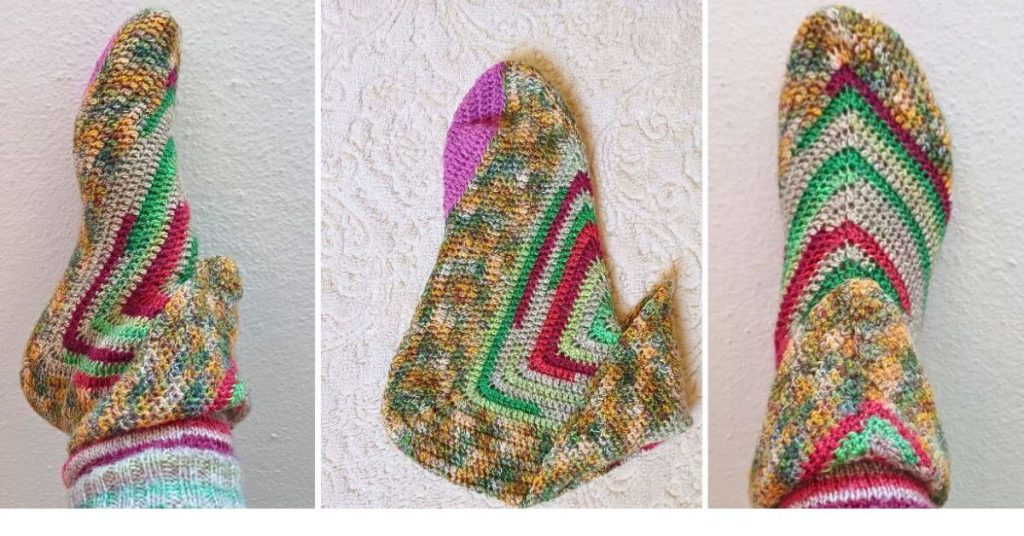
Do you have leftover sock yarn and cold feet? In this tutorial, I’m showing you how to turn two simple solid double-crochet squares into cozy, fitted slipper socks.
Unlike traditional socks that require complex heel turns, this method is 100% beginner-friendly. I use a special rounded corner technique in the last rows so the slippers hug your foot perfectly, plus a seamless join that feels invisible under your toes.
This is the perfect stash-busting project—it works up quickly and is fully customizable to any foot size!
Prefer visual instructions? Click here to jump straight to the video tutorial at the end of this post.
Materials & Supplies
Yarn: Sock yarn scraps (DK or 4-ply weight). I used Nako Boho and Alize Superwash.
Crochet Hook: 4mm (I used Tulip one).
Notions: ruler or measuring tape, tapestry needle, scissors, stitch markers.
(Note: This post contains affiliate links. As an Amazon Associate, I earn from qualifying purchases.)
Abbreviations (US Terms)
MR = Magic Ring (also known as Magic circle)
ch = chain
st(s) = stitch(es)
sl st = slip stitch
SC= single crochet
HDC = half double crochet
DC = double crochet
RS = Right Side (the front of your work)
WS = Wrong Side (the back of your work)
yo = yarn over
How to Customize Your Size (The No-Math Formula)
Forget complex sock math and confusing size charts. To make these slippers fit your unique foot perfectly, you only need a measuring tape and two simple numbers.
Because we are working with squares, we can adjust the size simply by adding or removing rounds.
1. The Width (For the Small Square)
First, measure the width of your foot right where your pinky toe ends.
Why this spot? In traditional sock making, this is the exact point where we usually start decreasing for the toe. By matching the small square to this width, you ensure the “toe box” fits snugly without being too loose.
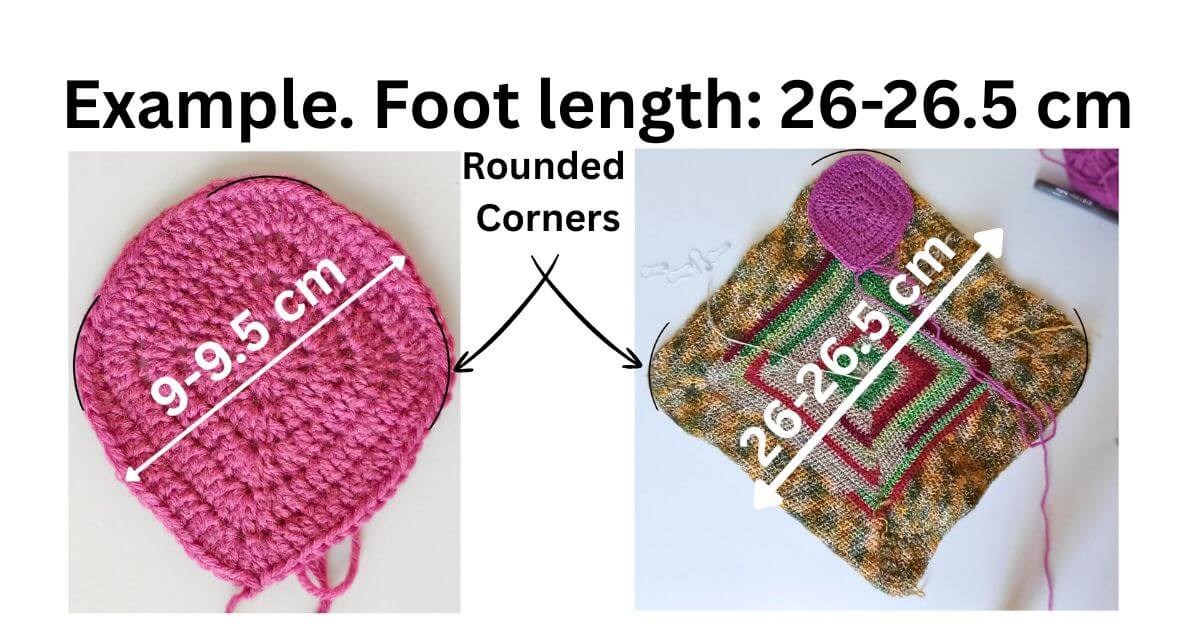
My example: I wear a EUR size 40-41. For me, this measurement is approximately 9–9.5 cm.
The goal: crochet small square until the side length matches this number.
2. The Length (For the Big Square)
Next, measure the total length of your foot from the back of your heel to the tip of your toes.
My example: My foot length is 26.5 cm.
The goal: crochet the big square until it aligns with this length.
Fit Tips
Tolerance: You don’t need to be millimeter-perfect. If your squares are within 0.5 cm of your measurements either way, they will still fit.
When in doubt, go smaller: if you are between rounds, I recommend going slightly smaller. Crochet fabric stretches over time, and a snug slipper stays on your foot better than a loose one!
Part 1: The Small Square (The Toe Sole)
This slipper uses a modified version of the classic Solid Double Crochet Square as its foundation.
💡 Important Prerequisite:
If you are new to crocheting solid squares or want to learn my “Invisible Seam Trick” to eliminate that ugly gap where the round joins, I highly recommend checking out my detailed guide first:👉 How to Crochet the Prfect Solid Square + Invisible Join
Read that post to master the base, then come back here for the “Rounding” steps below!
Step 1: The Base (Rounds 1–4)
For those who just need a quick refresher, here is the “cheat sheet” pattern for the base:
Start: Magic Ring.
Round 1: 12 DC into the ring, sl st to join round.
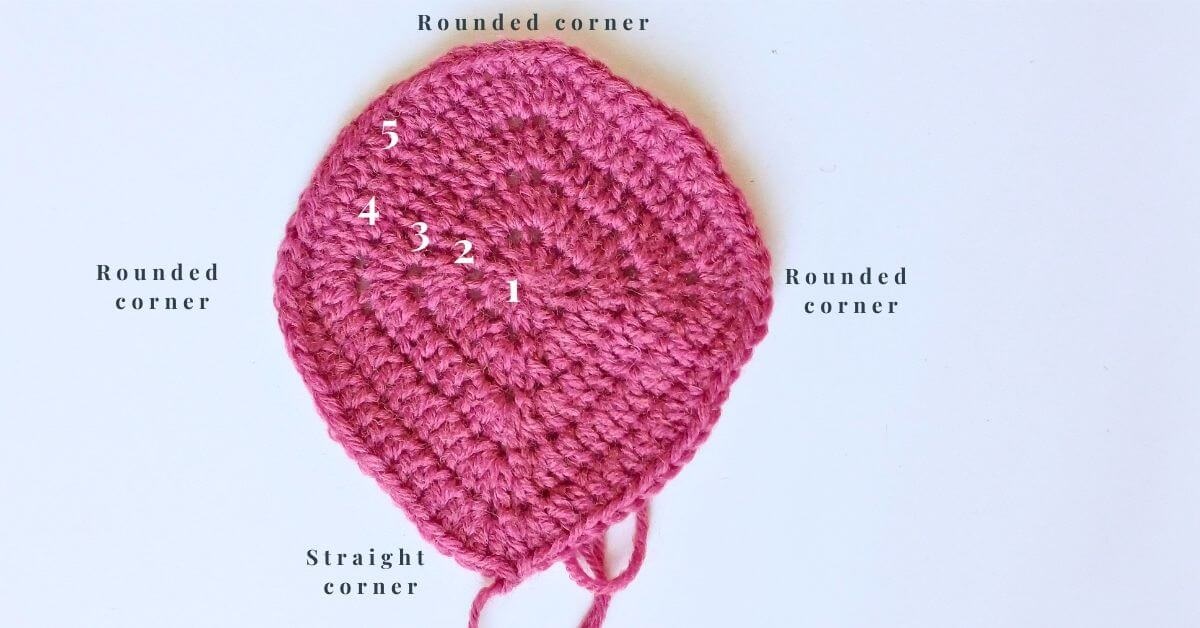
Round 2: 3 DC in the same stitch (half corner), 1 DC (side), 3 DC + 3 DC ( 2nd corner), 1 DC, 3 DC + 3 DC (3rd corner), 1 DC (side), 3 DC + 3 DC (4th corner), 1 DC (side), 3 DC (complete 1st corner), sl st to join rounds. (28 sts)
Tip: Place a stitch marker exactly between the two sets of 3 DC (corners). This marks the center of your corner for future rounds.
Round 3: 3 DC in the same stitch (half corner), 5 DC (side), 3 DC + 3 DC ( 2nd corner), 5 DC, 3 DC + 3 DC (3rd corner), 5 DC (side), 3 DC + 3 DC (4th corner), 5 DC (side), 3 DC (complete 1st corner), sl st to join rounds. (44 sts)
Round 4: 3 DC in the same stitch (half corner), 9 DC (side), 3 DC + 3 DC ( 2nd corner), 9 DC, 3 DC + 3 DC (3rd corner), 9 DC (side), 3 DC + 3 DC (4th corner), 9 DC (side), 3 DC (complete 1st corner), sl st to join rounds. (60 sts).
Further rounds: Increase each side by 4 stitches, corners are the same.
Continue until your square measures approx. 9 cm (or your specific pinky-toe measurement).
Step 2: The “Rounding” Round (5th Round)
This is where we deviate from a standard square. To make these slippers fit the curve of your foot comfortably, we need to round off the corners on the final round of the small square.
When to start: Do this on the round where you will reach your final width measurement.
Start 3 DC in the same st, Double crochet (DC) along the side until you are 6 stitches away from the corner marker.
Before the marker: work 3 half double crochet (HDC), then 3 single crochet (SC).
Pass the Corner Marker: Do not increase! Just work into the stitches. After the marker: work 3 single crochet (SC), then 3 half double crochet (HDC).
Continue DC until you reach the next corner’s “6-stitch zone” and repeat.
To finish the round 3 DC in the same stitch for the 1st corner, leave long yarn tail for sewing.
Part 2: The Large Square (The Body)
General Instructions: Crochet a standard solid square until you are 2 rounds away from your desired foot length size.
The Last 2 Rounds (The Deep Curve)
Second to Last Round:
Repeat the same “6-stitch” rounding method used on the small square (3 HDC, 3 SC before and after the marker).
The Final Round:
We need an even deeper curve
Start: 3 DC in the same stitch, DC until you are 9 stitches before the marker.
The Decrease: Work 3 HDC, then 6 SC.
Pass Marker: (No increases).
After Marker: Work 6 SC, then 3 HDC.
Finish Row: Continue with standard DC and 3DC in the same stitch to finish the 1st corner, sl st. Faster off.
Before sewing steam block the squares.

Part 3: Assembly (The Invisible Seam)
Now let’s turn these flat shapes into a 3D slipper.
Understanding the Construction
Before sewing, visualize the fit.
The small square becomes the sole (under your toes).
The big square wraps over the top of your foot and creates the heel.
1. The Alignment
Sandwich your squares together with the wrong sides facing each other.
Crucial Step: Ensure the sharp, non-rounded corners are facing DOWN. These sharp corners form the bottom sole and the heel of the slipper.
Pin the small square to the big square corner-to-corner to keep them secure.
2. The Sewing Method
I strongly recommend using the mattress stitch for assembly. It creates flat seam and won’t bother you at all!
Start sewing at the toe section (as shown in the image below).
Work your way back along the sole and up the heel.
Confused about how to align the squares? Jump to timestamp 20:18 in the video below to see me sew the invisible seam in real-time.
3. The “Try-On” Test
As you sew the final seam up the top of the foot towards the ankle, stop and slide your foot inside. This allows you to customize the ankle opening exactly to your preference. Once it fits snugly, fasten off and weave in your ends!
Make 2nd one exactly the same.
Did you make this pattern?
I’d love to see your color combinations! Tag me on Instagram @stylishknitwear or use the hashtag #2SquareSlippers. Happy crocheting!