
Raffia bags are having a major moment — and it’s easy to see why. With their natural, summery texture and effortlessly chic look, they’re the perfect accessory for warm-weather outings.
The pattern is very forgiving and beginner-friendly. The cluster stitch looks impressive but is actually quite simple once you get into the rhythm — I promise!
And about the raffia: ideally, you’d use natural raffia for that truly authentic feel — but it can be quite pricey. Instead, I used paper raffia, which is soft, widely available, and gives a very similar look. Just make sure yours is soft, because we’ll be working with two strands held together throughout.
Avoid stiff, non-transparent paper yarn — it won’t behave the same way and will be much harder to work with.
This post contains affiliate links. If you purchase through my links, I may earn a small commission at no extra cost to you. Thank you for supporting my work!
This summer raffia bag is created in three main parts.
You start by crocheting a flat rectangular base in single crochet, then work a border around it and join in the round to begin the body.
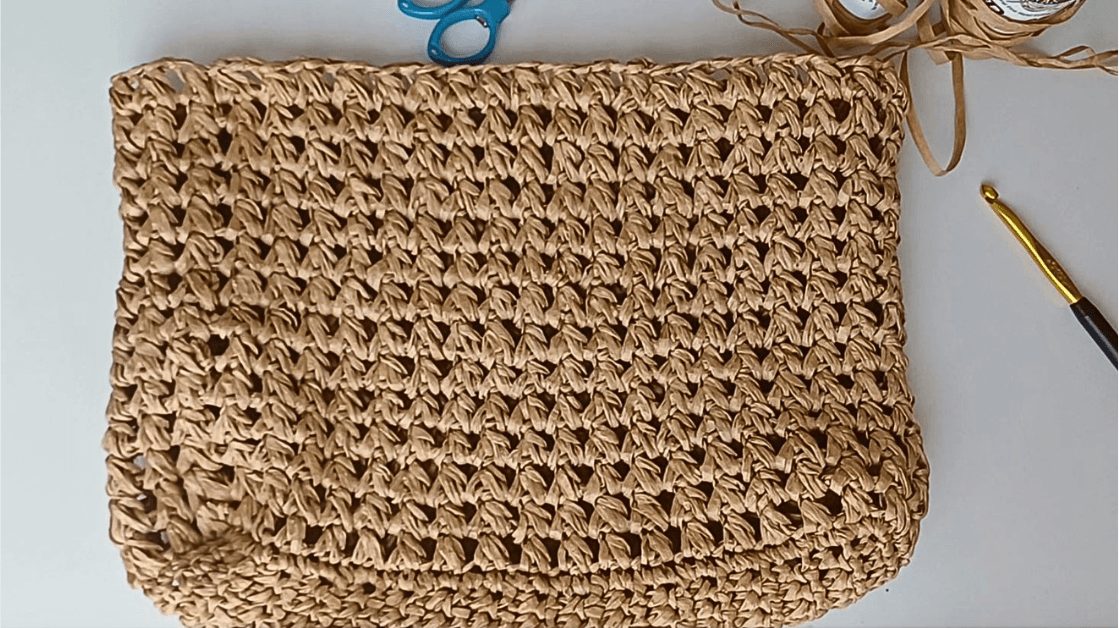
You work the body in a repeating cluster stitch pattern for 14 rounds, giving the bag its beautiful textured look.
Finally, you will crochet handle panels flat on each side of the bag, and then sew or snap the handles into place.
Watch the full video tutorial on YouTube for a visual walkthrough of every step.
Materials & Tools You’ll Need
Yarn
• Paper raffia — 2 x 100 g balls (2 x 160 m = 320 m total), held double throughout
• Natural raffia works too if you prefer a more premium finish
Hooks
• 5 mm crochet hook — for the base
• 6 mm crochet hook — for the body and handle panels
Handles
• Sew-in style handles, 45 cm (17.7 in)
• Snap-on handles are easier as they skip the sewing step — use whichever you can find!
Other supplies
• Stitch markers (several)
• Yarn needle for weaving in ends
• Iron and pressing cloth for blocking
• Optional: glue for securing yarn ends
Abbreviations & Stitch Guide
Not sure what the abbreviations mean? Here’s a quick reference for all the stitches and terms used in this pattern:
Abbreviation | Stitch / Term | |
ch | Chain | |
sc | Single crochet | |
sl st | Slip stitch | |
yo | Yarn over | |
cl | Cluster stitch | |
sp | Space | |
st(s) | Stitch(es) | |
rep | Repeat | |
RS / WS | Right side / Wrong side |
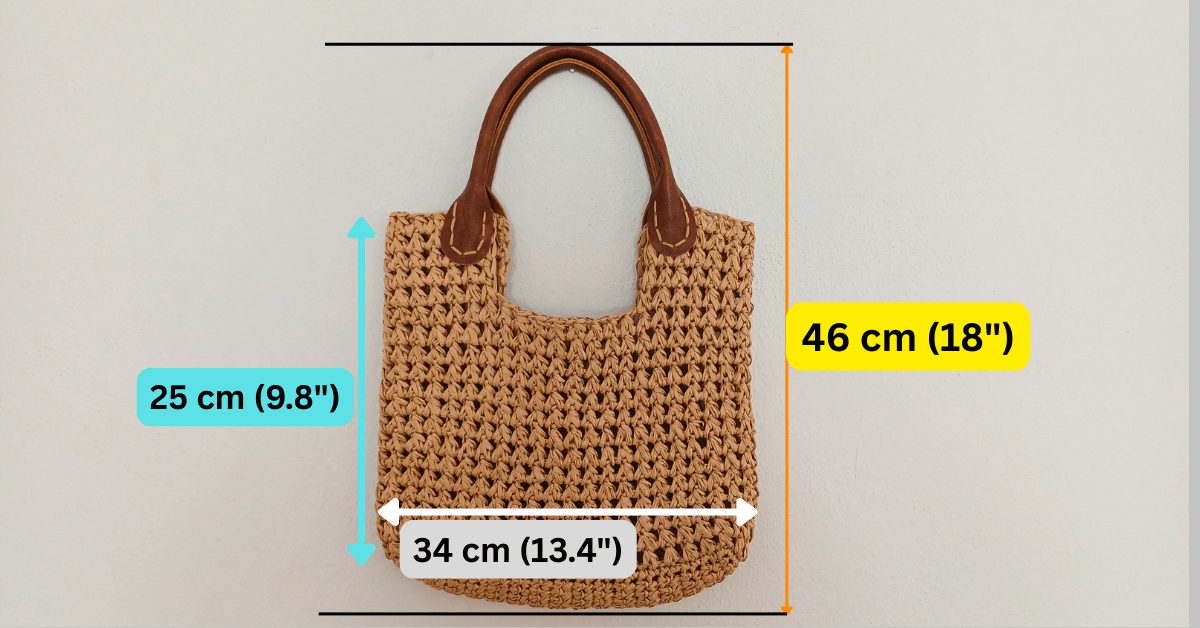
Finished Size
• Body: 14 rounds of cluster stitch (44 clusters per round, 88 stitches total)
• Handle panels: 5 rows worked flat on each side.
The main stitch used for the body is the cluster stitch (cl) — each cluster spans 2 stitches wide and creates a beautiful textured pattern that holds its shape well in raffia. Working in two strands held together gives the bag the right amount of structure while keeping it soft.
Read through all the steps before you begin so you have a clear picture of the process.
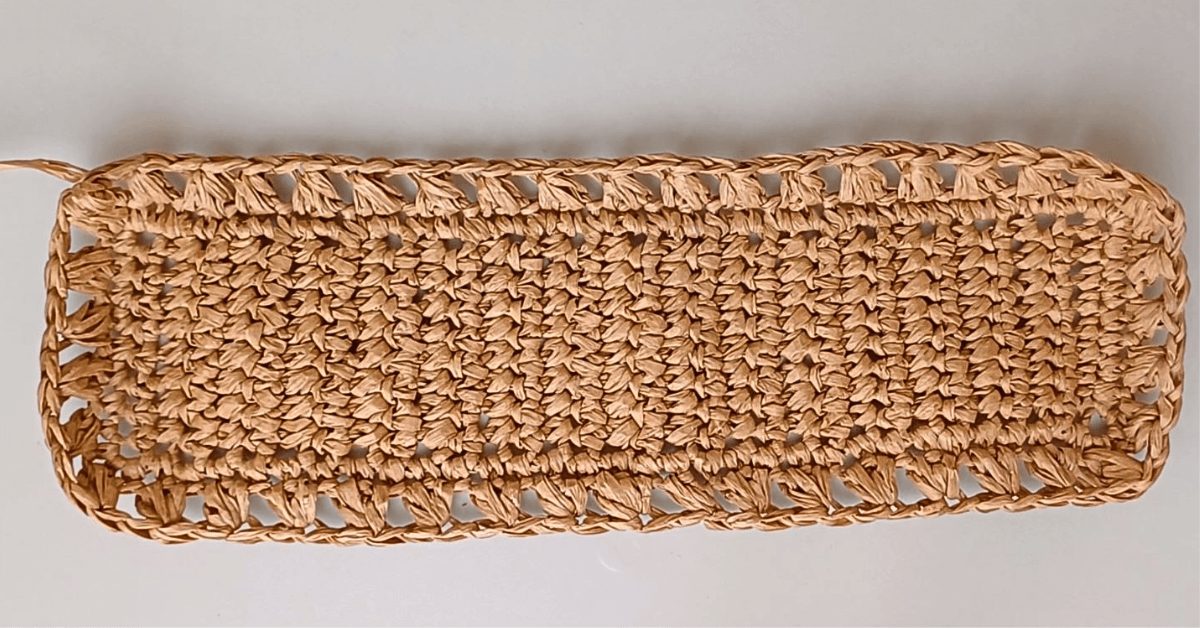
Step 1: Crochet the base rectangle
We’ll start by crocheting a flat rectangular base using the 5 mm hook. The smaller hook creates a slightly firmer, sturdier base — perfect for a bag that needs to hold its shape.
How to work it:
• Ch 10.
• Flip the chain over — you’ll see bumps along the back. We’ll insert the hook into these bumps.
• Starting from the 2nd bump from the hook, work 9 sc.
• Ch 1 and turn. Work 9 sc, inserting the hook under both loops.
• Continue in this way — 9 sc, ch 1, turn — for 33 rows in total.
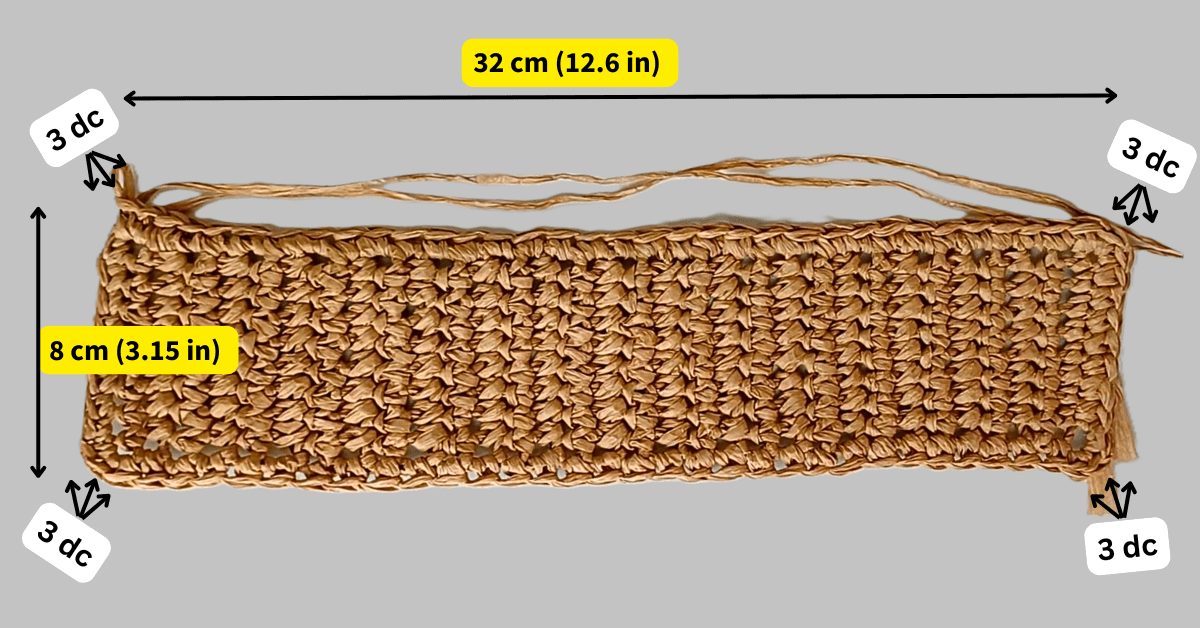
Your base should measure approximately 7 cm (2.75 in) wide x 31 cm (12.2 in) long at this point.
Turning the corners:
When you reach the last stitch of the final row, it’s time to work around the perimeter of the base.
• Work 3 sc into the last st (corner increase).
• Work 1 sc into each row end along the side.
• At each corner, work 3 sc into the same st.
• Along the starting chain edge, work into each of the visible openings — 1 sc per sp.
• Continue all the way around, finishing with 3 sc in the final corner st and weaving in the yarn tail as you go.
After completing the border, your base should measure approximately 8 cm (3.1 in) wide x 32 cm (12.6 in) long.
Don’t skip the border row — it creates the neat edge that we’ll later pick up stitches from when joining in the round.
Step 2: Join in the Round & Set Up Stitches
Now we switch to the 6 mm hook and join to work in the round. You can use any join method you prefer — here’s how I do it:
• Insert the hook from back to front and draw up a loop, pulling it to the back.
• You’ll see a small bar at the join point. Insert the hook into this bar from front to back.
• Place the working loop at the back of the hook, yo, and pull through both loops.
Once joined, check your stitch count. You should have 88 sts around the base. Count carefully before moving on — getting this right sets up the whole body of the bag.
If your count is off, it’s worth taking a moment to recount rather than continuing — a stitch discrepancy at this stage will affect your cluster count throughout.
Step 3: Block the base
Before moving on to the body, we need to block the base. This is a really important step with raffia — blocking helps to flatten and even out the stitches and gives the bag a much more polished, professional look.
How to block:
• Lay the base flat on an ironing board, WS facing up.
• Using a pressing cloth or damp towel, iron with medium heat.
• Gently stretch and shape as needed, then leave to cool completely before moving on.
Don’t skip this step! Blocking makes a huge difference, especially with paper raffia, which can be a little unruly before it’s set.
Step 4: Work the Cluster Stitch Pattern
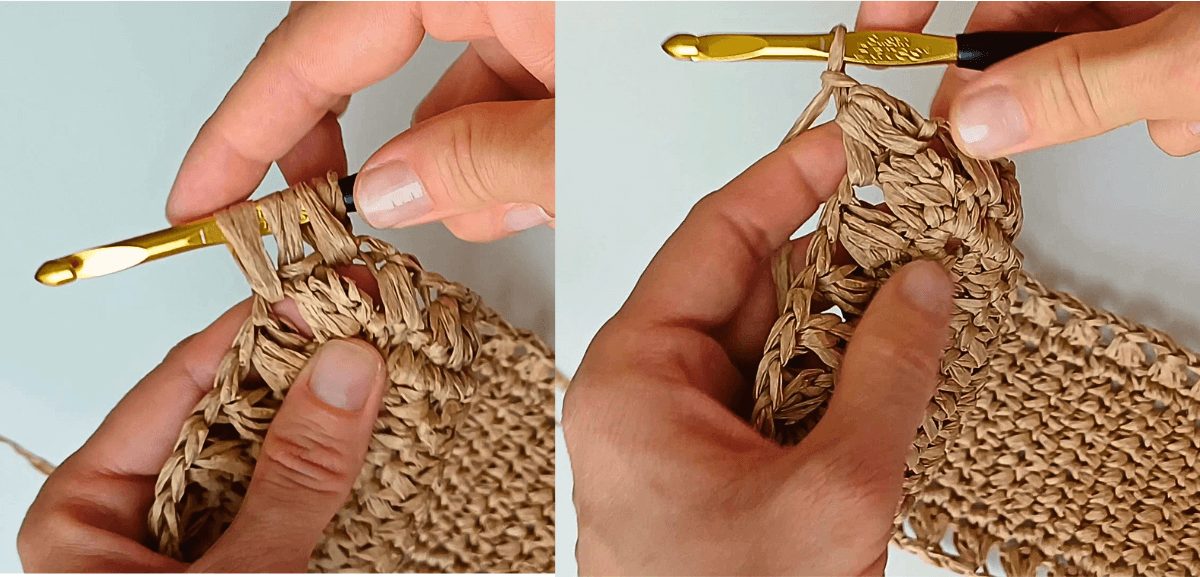
This is the heart of the pattern! The cl is what gives the bag its gorgeous texture. Each cl spans 2 sts wide, and you’ll work 44 cl per round (14 rounds in total).
How to work the cluster stitch / cl (Round 1):
• Ch 1.
• Yo, insert hook into the same sp, draw up a loop.
• Yo, insert hook into the next st, draw up a loop — you now have 5 loops on the hook.
• Yo and pull through all 5 loops.
• Ch 1. First cl complete!
• Rep: yo, insert into the next st, draw up a loop, yo, insert into the following st, draw up a loop, yo, pull through all 5 loops, ch 1.
• Continue until you have 44 cl.
Joining the round:
Join with a sl st to the ch at the very top of the last cl (not the st on the side — that’s not the real stitch). Use the same visible join method from Step 3.
Round 2 onwards:
From round 2, you’ll work around the clusters from the previous round — think of it as hugging each cl from both sides.
• Ch 1, yo.
• Insert hook into the sp to the right of the previous cl, draw up a loop.
• Move to the sp to the left of the same cl, draw up a loop — 5 loops on the hook.
• Yo, pull through all 5, ch 1.
• Rep all the way around.
You’ll be working into each sp twice as you go around — once from each side of the cl. It’s a very simple rhythm once you get going, and the result looks beautiful!
Work 14 rounds of cl.
Count your clusters at the end of each round — you should always have 44. If you lose count, look for the joining ch as a marker for where each round starts.
Step 5: Block the body
Once the body is complete, cut the yarn and join the final round with a visible join. Then it’s time to block again.
• Turn the bag inside out and lay it flat.
• Iron from the WS with medium heat to even out the stitches.
• Gently stretch and shape the bag as needed.
This is also a good time to weave in or secure your yarn ends. Bury them on the inside of the bag, and if you want extra security, a small dab of glue works well.
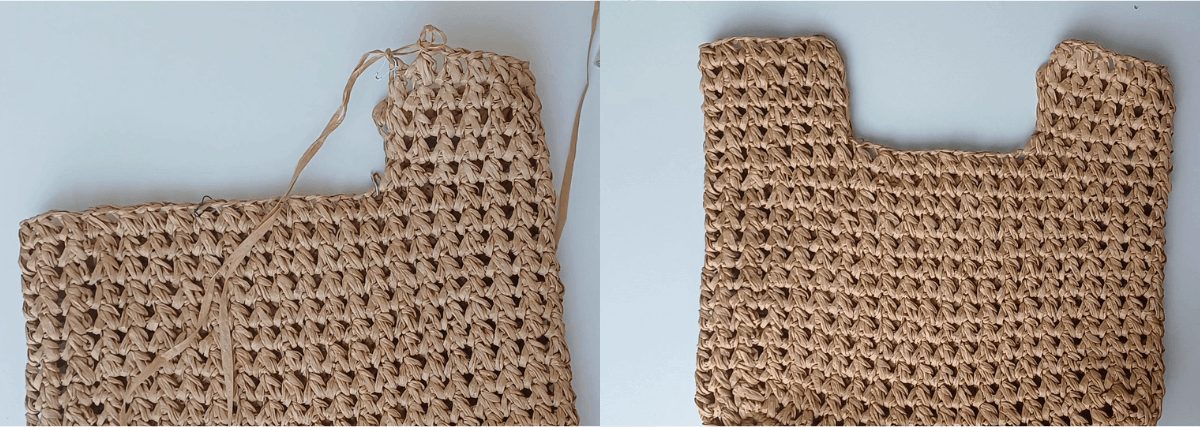
Step 6: Create the Handle Panels
The handle panels are the trickiest part of this pattern, but don’t worry — there’s a clever trick that keeps everything neat and consistent without cutting your yarn.
Placing your stitch markers:
• Try on your handles to decide placement.
• Mark the positions: 8 cl in the centre of each side (front and back), and 14 cl on each side of the centre for the handle panels.
• Adjust based on your handle size if needed.
Working the first side:
• Go to the stitch marker and insert the hook into that sp.
• Work your cl as usual until you reach the next marker (14 cl total for the handle panel).
The yarn carry trick (getting back to the start without cutting):
Instead of cutting the yarn to start a new row, we carry it along the previous row. This keeps the pattern perfectly consistent with working in the round.
• At the end of the row, ch 1 and place a stitch marker in that loop — leave it nice and loose.
• Carry the working yarn loosely along the previous row back to the starting position.
• To create the first cl of the new row, insert the hook into the middle of the first cl to create an opening.
• Work the cl as usual — and you’ll see the pattern flows right on without interruption.
• As you work along, the carried yarn strand gets hidden neatly inside the sts.
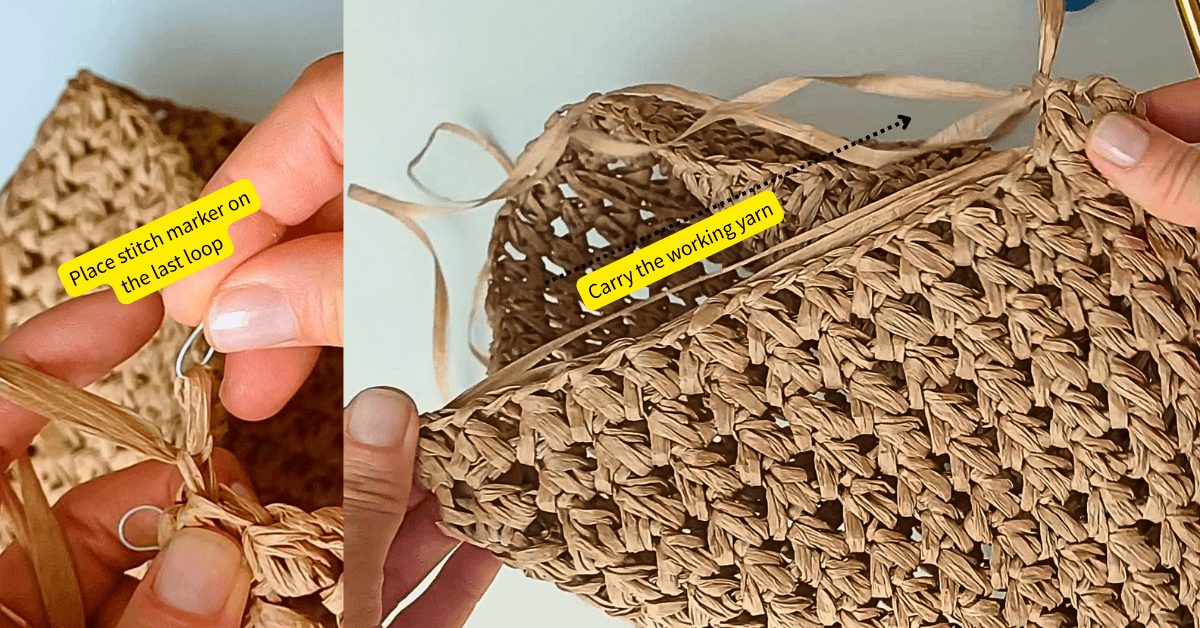
Finishing the row:
At the end of each row, use the stitch marker loop as your anchor. Insert the hook into that loop and also into the base of the last st to draw up a loop — 5 loops on the hook, yo, pull through all 5, ch 1. Place a new stitch marker in the new loop and rep.
Work a total of 5 rows for each handle panel. Then move on to the second side and rep exactly the same steps.
Do a test fit with your handles after each row or two to make sure the panel height is working for your specific handles.
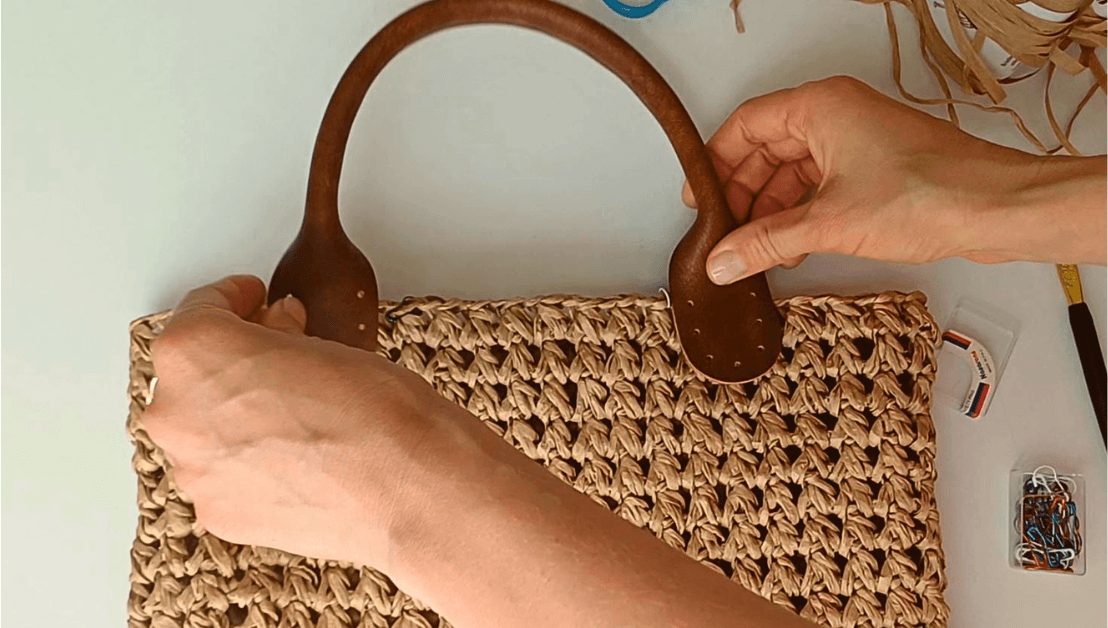
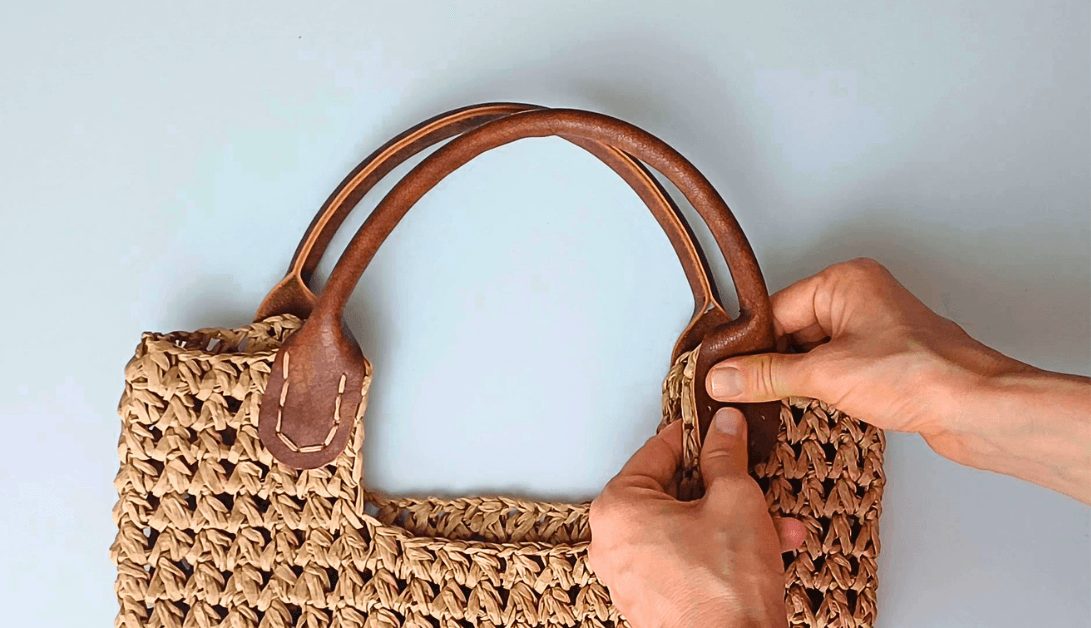
Step 7: Attach the Handles
With the handle panels done, it’s time to attach the handles. The method will depend on the type you chose:
• Snap-on handles: simply click into place — no sewing needed! This is the easier option if you can find them.
• Sew-in handles: attach using a regular backstitch for a secure, clean finish.
Tips for sewing on handles neatly:
• Try not to pierce through the raffia yarn itself. Instead, find the spaces between sts and work through those.
• Keep your tension consistent throughout for an even line of stitching.
Step 8: Final Finishing Touches
You’re almost done! Here are the last steps to give your bag a beautifully finished look:
• Iron the handle panels from the inside to smooth everything out and, if needed, gently stretch to align the panels.
• Weave in or glue any remaining yarn ends, burying them neatly inside the bag.
• Give the whole bag a light press from the WS to even out any remaining uneven sts.
Does this bag need a lining?
Honestly — no! The cl worked in two strands of paper raffia creates a dense enough fabric that you can’t see through it, which means lining is completely optional. This is a great time-saver if you’d rather skip it. The bag holds its shape beautifully without lining.
If you do want to add a lining for a more polished interior finish, a lightweight cotton or linen fabric works best and won’t add unnecessary weight.
Frequently Asked Questions
Yes! Natural raffia will give a more premium, authentic finish. Just be aware it can be harder to find locally and is usually more expensive. The pattern works the same way — just make sure whatever raffia you choose is soft enough to work with two strands held together.
Absolutely. To adjust the size, simply change the number of chains for your base (adding or subtracting in pairs) and adjust the number of rounds worked for the body. Keep in mind that any size changes will affect your yarn quantities and handle placement.
No — the fabric is dense enough that you can’t see through it, so lining is purely a matter of personal preference. If you do want one, a lightweight cotton or linen in a complementary colour works beautifully.
Either sew-in or snap-on handles work well. Snap-on handles are quicker and avoid sewing, but sew-in handles give you more flexibility in terms of size and style. I used 45 cm (17.7 in) handles, which gives a comfortable shoulder or hand carry.
Yes! If you’re comfortable with basic crochet (sc, sl st, and joining in the round), you’ll be absolutely fine. The cl looks complex, but is very repetitive once you get the hang of it — most beginners pick it up within the first round.
Just the handle part might be confusing, but this is the skill you will learn after you finish the bag.
Conclusion
And there you have it — your very own handmade summer raffia bag! From a simple flat base worked in sc, through 14 rounds of cl, to the neat handle panels and final finishing touches, you now know exactly how to make this bag from scratch.
Whether you use paper raffia or natural, sew-in handles or snap-on — this pattern is flexible, forgiving, and genuinely enjoyable to make.
You might like other crochet bag tutorials:
Luxury Look Raffia Bag Tutorial | Crochet With Me
Crochet Clutch with Metal Clasp Frame