The long tail cast on is a classic and widely used method for starting a knitting project.
It creates a neat and elastic (not too stretchy, though) edge, making it perfect for a variety of projects, from cozy scarves to intricate sweaters. This cast on method involves using both the working yarn and a “long tail” of yarn to form the initial stitches on the needle.
Apparently, easy to learn. Let’s find that out!
How to knit long tail cast on?
Follow a video tutorial if you are a visual learner or follow the picture tutorial if you need a general understanding of how to knit this cast-on method.
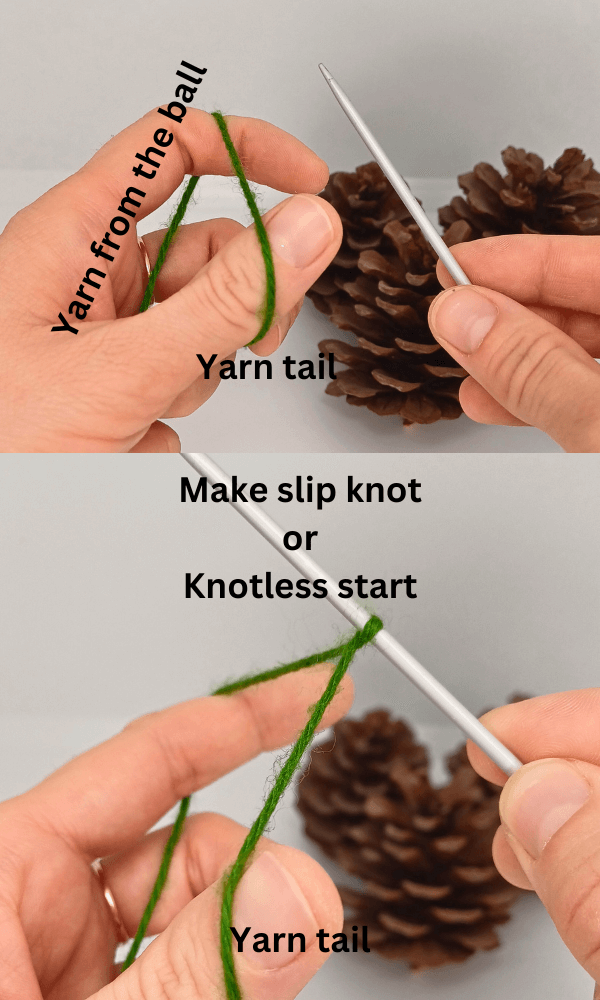
Step 1. Let’s first create a slipknot. Make a loop where working yarn comes on top of the loop and yarntail under
Make another loop and slide into the first loop created.
Put knitting needle into the loop we just put through the first loop.
Tighten up the loop on the needle.
Step 2. Set up for the next cast-on stitch. Put your index finger and thumb between two strands. Thumb is holding yarn tail. Index finger holds working yarn.
Step 2a. Make a slight turn with your left hand counterclock wise and you will get in this position.
Step 3. Put knitting needle between these two strands around thumb from underneath.
Step 3a. Pull the yarn up
Step 4. Move the needle to the index finger between two strands of yarn from the top and grab a closer strand of yarn.
Step 4a. Grab the yarn and come out through the loop around the thumb.
Step 5. Release both fingers and tighten up the loop we just now created.
Repeat steps 2-5.
Start without slip knot
Once you get the basics, you can use knotless start instead.
Knotless start. Make a loop around the needle by inserting it under the strand between the thumb from left to the right and index finger and turning the strand clockwise.
How many needles should I use for a long tail cast on?
There are three effective approaches to needle setup for the long tail cast on, each with distinct advantages:
Single Needle Method
Setup: Cast all stitches onto one needle – the same needle you’ll use for your project.
Pros:
Simplest and most straightforward approach
Cons:
Edge may be too tight, especially for projects requiring stretch (socks)
First row will be tight and therefore can be harder to knit it
Two Identical Needles Method
Setup: Hold two needles of the same size (your project needle size) together and cast on over both. Remove one needle when complete.
Pros:
Creates additional space in each stitch for a more relaxed edge
Particularly useful for projects requiring stretch (hat brims, sock cuffs)
Maintains the gauge of your project
Cons:
Cast-on edge most likely will look sloppy. Personally, I don’t prefer this method
Two Different-Sized Needles Method
Setup: Cast on with your project needle plus a second needle 1-1.5 sizes smaller.
Pros:
Creates a firm yet elastic edge with excellent stitch definition
Particularly good for garments where structure is important
Helps maintain an even tension more easily than single needle
Edge appears more polished and professional
Cons:
Requires having additional needle sizes on hand
When to use each method:
Single needle: Quick projects, experienced knitters with good tension control, or when a firm edge is desired
Two identical needles: Projects needing stretch (socks, hats, cuffs), or for knitters who tend to cast on too tightly
Two different-sized needles: Garments where edge appearance is critical, or for the most professional-looking results
Frequently Asked Questions:
How long should my tail be?
Rule of Thumb: Width of project multiplied by 3. For example, if you want to cast on for an 18″ hat circumference, 18″ × 3 = 54″ starting tail.
What if I run out of tail before finishing my cast on?
If you run out of tail before completing your cast on, you’ll need to start over with a longer tail. To avoid this frustration, you can:
Be generous with your tail length – it’s better to have too much than too little
Use the “wrap around needle” method: wrap your yarn around your needle once for each stitch needed, plus a few extra for security, then add 6-12″ for the initial tail
How do I maintain even tension during a long tail cast on?
Keep your fingers relaxed but consistent in their movements
Don’t pull too tightly – the stitches should slide easily on your needle
Practice the rhythm of the motion rather than focusing on each individual stitch
For very long cast ons, take breaks to avoid hand fatigue which can lead to tension changes
How do I count my cast on stitches accurately?
Place stitch markers every 10 or 20 stitches as you cast on
Count completed stitches in groups rather than individually
Remember that the loop on your needle counts as a stitch
Double-check your count before joining in the round or starting your first row
What alternatives exist for very large projects?
The “knitted cast on” uses less yarn and doesn’t require estimating a tail length
The “cable cast on” provides a firm edge without needing a long tail
Is the long tail cast on stretchy enough for all projects?
The standard long tail cast on provides moderate stretch. For extra-stretchy edges:
Use a larger needle for the cast on, then switch to your project needle
Try the “German twisted cast on” (a variation of long tail) for additional elasticity
Consider the “tubular cast on” for ribbing that needs maximum stretch
Why does my cast on edge look uneven?
Uneven cast on edges are usually caused by:
Inconsistent tension
Pulling too tightly on the working yarn
Alternating between different hand positions
Switching between continental and English-style hand positions
Can I use the long tail cast on for circular projects?
Yes! The long tail cast on works perfectly for circular projects, but be careful not to twist when joining. To join in the round:
Ensure all stitches are facing the same direction on your needle
Align the first and last stitches carefully
Place a marker at the join
Check for twists before working your first round
For beginners, knitting casting on long tail may take some practice to master. Achieving an even tension and consistent stitch size can be challenging at first. If not done correctly, it can result in uneven stitches and an unprofessional-looking edge.
Despite these potential downsides, many knitters find the long tail cast on to be their go-to method for its balance of elasticity and neatness. It’s important to explore various cast on techniques and choose the one that best suits the specific requirements of your project.
Once you master long tail cast on, you can learn other methods: