
Last updated on July 6th, 2024 at 12:32 pm
Crochet hats are all the rage this year! This simple free crochet hat pattern is perfect for beginners.
It took me 1 full crocheting day to make, and it’s a great way to practice your crochet skills. (I certainly did!)
Plus, you can personalize it with any color or design you like (I made in red and yellow). So why not try it?
Materials for crochet summer hat
- Paper yarn (or raffia) approx. 200grams
- Crochet hook 4mm (US G-6)
- Stitch marker
In the written pattern, I used American abbreviations.
Conversion from US to UK abbreviations
Half double crochet (hdc) – half treble crochet (htr);
single crochet (sc) – double crochet(dc);
Slip stitch (sl st)
Stitches (sts)
Rnd- round
inc-increase
Gauge:
14 sts per 10cm/ 15 rows per 10 cm. 10 cm = 3.94 inches.
This is a hat for head circumference around 56-57 cm. At the end of this tutorial, I will explain how you can adjust brimmed crochet hat to any size (spoiler – just make smaller flat top part of the hat!)
Skills:
- You will need to know how to make a single crochet circle in a spiral.
- How to increase – 2 single crochet in the same stitch.
- Front single crochet post stitch (I will show you how to make it).
This is a beginner friendly crochet hat tutorial, so I will make sure you get it right for any head circumference!
Let’s get started!
Free Crochet Hat Pattern
Hat is made from 3 parts – crochet flat top, crown and a brim.

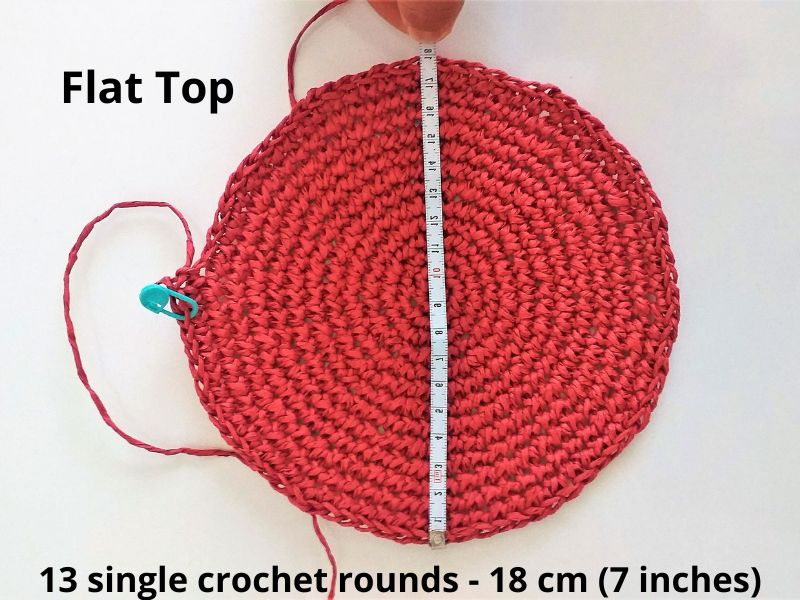
Crochet flat top
(Diameter 18 cm, head circumference 55-57 cm)
Start with a single crochet (UK double crochet) flat circle in the spiral.
Rnd 1: 6sc into a magic ring. Move marker to first stitch of each round.
Rnd 2: inc around–12 sts. Move the marker.
Rnd 3: *1 inc, 1sc; work from * 6 times–18 sts. Move the marker.
Rnd 4: 1 sc, *(inc, 2sc)* 5 times, inc, 2 sc – 24 sts. Move the marker.
Rnd 5: *1 inc, 3sc; work from *6 times–30 sts. Move the marker.
Rnd 6: 2 sc, *(inc, 4sc)* 5 times, inc, 2 sc–36 sts. Move the marker.
Rnd 7: *1 inc, 5sc; work from * 6 times–42sts. Move the marker.
Rnd 8: 3 sc, *(inc, 6 sc)* 5 times, inc, 3 sc–48 sts. Move the marker.
Rnd 9: *1 inc, 7sc; work from * 6 times–54 sts. Move the marker.
Rnd 10: 4 sc, *(inc, 8 sc)* 5 times, inc, 4 sc–60 sts. Move the marker.
Rnd 11: *1 inc, 9sc; work from * 6 times–66 sts. Move the marker.
Rnd 12: 5 sc,* (inc, 10 sc)* 5 times, inc, 5 sc–72 sts. Move the marker.
Rnd 13: *1 inc, 11sc; work from * 6 times-78 sts. Move the marker.
As you can see, there is a pattern behind a flat circle – we increase evenly every round by 6 stitches.
Crochet tip! To make a perfectly round circle, change the placement of the increases from round to round. This is exactly what I have in this written pattern.
Crochet Hat Crown
After you finished crochet a flat circle, the crown is easy. 12 rows crochet in the round without increasing.
Rnd 14-25: single crochet rounds without increases-78 sts. Don’t forget to move the marker.
Round 26 is optional. You can skip and move to the brim straight away. Front post stitch round makes the corner between brim and crown look more defined.
Rnd 26: Front post single crochet all around (78 sts).
In the image below you can see how the direction of stitches change after front post stitches.
If you don’t know how to crochet front post stitch, have made a short video tutorial. One good video speaks more than 1000 words, right?!
Click the orange button below!
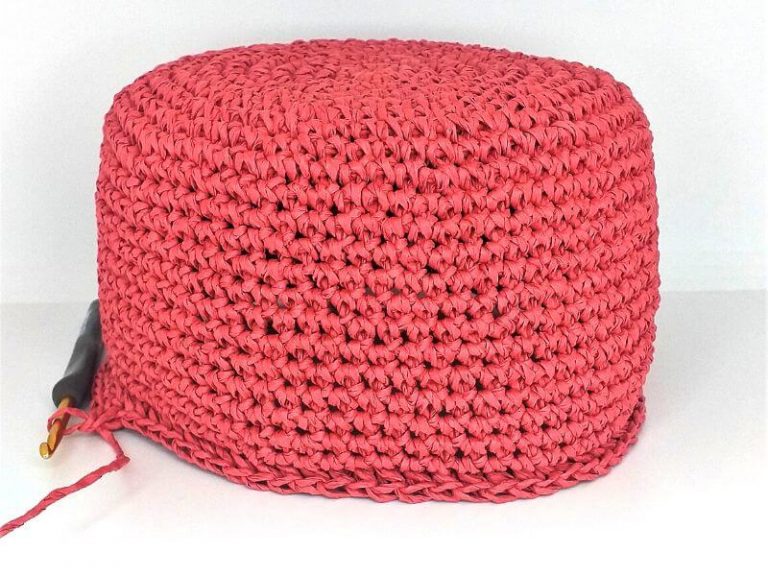
How To Crochet Brim
To make a brim for a crochet hat, you will need to increase for flat circle again. The last increase was in round 13. So, we need to continue as if we would continue increasing from flat top.
My brim is 10 rows, which makes 7 cm (2.75’’). You can make even bigger by adjusting the following rows.
- Rnd 27: 6 sc (inc, 12sc) 5 times, inc, 6 sc–84 sts. Move the marker.
- Rnd 28: *1 inc, 13sc; work from * 6 times–90sts. Move the marker.
- Rnd 29: 7 sc (inc, 14 sc) 5 times, inc, 7 sc–96 sts. Move the marker.
- Rnd 30: *1 inc, 15sc; work from * 6 times–102 sts. Move the marker.
- Rnd 31: 8 sc (inc,16 sc) 5 times, inc, 8 sc–108 sts. Move the marker.
- Rnd 32: *1 inc, 17sc; work from * 6 times–114 sts. Move the marker.
- Rnd 33: 9 sc (inc, 18 sc) 5 times, inc, 9 sc–120 sts. Move the marker.
- Rnd 34: *1 inc, 19sc; work from * 6 times-126 sts. Move the marker.
- Rnd 35: 10 sc (inc, 20 sc) 5 times, inc, 10 sc–132 sts. Move the marker.
- Rnd 36: *1 inc, 21sc; work from * 6 times-138 sts. Move the marker.
Since we are crocheting in the spiral rounds, to avoid a jug, before casting off, make a slip stitch instead of single crochet.

Crochet Sun Hat YouTube Tutorial
If you are a visual learner, here is a video tutorial on YouTube!

How to adjust a crochet hat pattern size?
The crochet hat pattern for adults and children differs based on head size. The circumference of the adult’s head is greater than that of the child’s. If we want to make a hat for a child, we do a follows.
First, we need to measure head circumference, let’s say 52cm (20,4 inches).
Second, hat circumference is a measure around the head where you want a hat to sit (usually just above ears).
Third, subtract around 1 inch (1-1.5cm) for a nice fit (you don’t want hat to fit loosely – wind might blow it away).
Now we know that the flat top part circumference is 50cm.
Circumference of a circle:
C = 2πr = πd
C=50
You need to divide hat circumference by 3.14 (π-pi).
Flat Top
50/3.14=15.9 cm (6.25 inches). We can round up the numbers, no big deal. The diameter of the flat circle should be around 16 cm (6.3 inches) for head size 52cm (20.4 inches).
Crown and Brim
After flat top, crown and brim is no-brainer. For smaller size, make fewer rows. It depends on the look you are after.
Conclusion
Hope you have enjoyed free crochet hat pattern and that you have learned something new.
You might get interested in crochet bucket hat tutorial. Check it out!
Also, you can surf a website for other tutorials too!
See you soon!