
Last updated on April 24th, 2025 at 12:11 pm
Every knitter knows that moment: you’re working on a project and think, “There must be an easier way to do this!” You’re right—there is! Whether you’re struggling with uneven ribbing, messy seams, or mysterious holes in your underarms, these tested knitting hacks will transform your crafting experience.
I’ve collected these problem-solving techniques through countless projects. From beginner-friendly yarn selection to advanced sleeve shaping tricks, these 13 knitting hacks will help you create more professional-looking projects with less frustration.
GETTING STARTED RIGHT
Beginner-Friendly Yarn
For those new to knitting, starting with the right yarn can make a significant difference. Here are some recommendations:
Wool or Wool Blend Yarn
Wool and wool blend yarns are ideal for beginners because they are:
- Elastic: Comfortable to work with and easy on the hands.
- Smooth: Slide well on the needles, making the knitting process smoother.
- Forgiving: Hides minor imperfections in your knitting.
Color Choice
- Light Colors: Opt for lighter colors as they make it easier to see your stitches, which is helpful when learning new techniques.
Yarns to Avoid
- Cotton Yarn: Not recommended for beginners because it is:
- Inelastic: Less forgiving and harder to work with.
- Unforgiving: Shows every imperfection, which can be discouraging for new knitters.
Best Yarn Weight for Beginners
The ideal yarn weight for beginners is medium worsted weight yarn. This type of yarn is typically used with needles sized 4.5-5.5 mm (US size 7-9). Here’s why it’s a great choice:
- Quicker Results: Medium worsted weight yarn works up faster, allowing you to see your progress and finish projects more quickly.
- Ease of Use: The size of the yarn and needles is manageable and less fiddly, making the learning process smoother.
By choosing the right yarn and needle size, beginner knitters can enjoy a more pleasant and rewarding knitting experience.
Gauge Swatch
A gauge swatch is a knitting sample where you try a chosen pattern, needle size and yarn to get the right measurements.
A gauge swatch is an important first step before knitting the desired garment. It should be at least 3.9” by 3.9” (10cm by 10cm) in size. Bigger swatch – more accurate calculations.
Start knitting swatch, not with the main pattern, but garter stitch or ribbing, or any other finishing technique you will use in a garment to see how they behave according to each other. For example, a garter stitch is narrower than Fisherman’s rib pattern. So, after a garter stitch, decrease stitches to get the same width. This is very helpful to know before you start and will eliminate further mistakes.
When you are happy with a swatch, it is time to measure how many rows and stitches there are. Measure before washing and after washing. This will help you understand if the yarn has changed its shape – shrinks or gets bigger.
Knitting flat and in the round
Usually, knitters have a different gauge in flat knitting compared to round knitting. Round knitting is tighter because every row is a knit row. In flat knitting, you alternate knit and purl rows which might lead to tension difference.
Solution: If you plan to knit in the round, the swatch should be knitted in the round.
RIBBING & EDGE PERFECTION
Creating Neater Ribbing
When you learn to knit and purl stitches, the first pattern you will learn is a rib stitch pattern. It is a combination of knit and purl stitches. The most commonly used ribbing is 1×1 (alternating 1 knit and 1 purl stitches) and 2×2 (alternating 2 knit and 2 purl stitches), but other combinations are widely spread.
If you want the ribbing to hold shape better and look neater, use a slightly smaller needle size than for the rest of the knitting.
How to remove purl dash lines in multicolor ribbing?
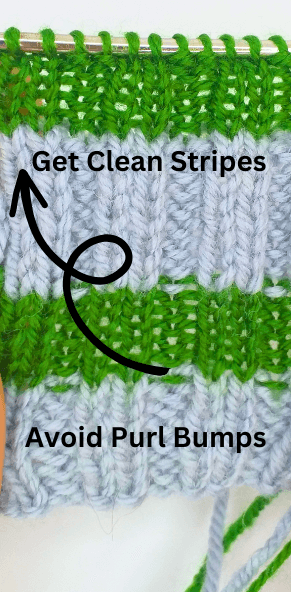
Ribbing without ‘icky dots. That’s easy! When you start new color, knit the whole first row. After that, switch back to ribbing. Trust me, on the right side, knit row will be invisible.
Works great in knitted garments where you consider right and wrong side, for example, hats, socks, sweaters, etc.
Will not work well for scarfs because all the purls are on the wrong side and they will be visible. If you knit a scarf, I would suggest to stick with purl bumps on both sides.
Watch a short video where I show how to knit clean stripes in knitting (right and wrong side)!
Knitting stockinette neat edges
Don’t know how about you, but when I knit stockinette, I usually get sloppy last stitches at the end of the knit row. It has all to do with tension since I am a continental knitter, purl rows are looser and knit rows tighter. To have ideal stockinette, I learned to adjust the tension. Purl rows I knit tighter and knit rows – not too tight.

The solution to getting rid of a sloppy edge
- At the beginning of the purl row, purl 3-4 stitches tighter than usual;
- At the beginning of the knit row, knit 3-4 stitches tighter than usual;
This is very important to get edges as neat as possible, especially when seaming parts to get a nice-looking seam.
PROFESSIONAL SEAMING & JOINING
Seamless-Looking Seams & Perfect Joins
In knitting, seaming techniques are used to join different pieces of a project together. These techniques ensure that the final product is neat, durable, and has a professional finish. Here are some common seaming techniques used in knitting:
- Mattress Stitch:
- Often used for side seams (e.g., on sweaters).
- Provides an invisible join when worked correctly.
- You work the seam from the right side, weaving the yarn back and forth through the edge stitches.
- Backstitch:
- A strong, durable seam often used for shoulder seams.
- Similar to sewing backstitch, it involves stitching back and forth to create a strong join.
- Typically done on the wrong side of the work.
- Three-Needle Bind-Off:
- Used to join live stitches, such as shoulder seams.
- Involves placing the pieces right sides together and using a third needle to bind off the stitches.
- Creates a neat, sturdy seam with minimal bulk.
- Kitchener Stitch (Grafting):
- Used to join two sets of live stitches seamlessly, often seen in sock toes.
- Mimics the look of knitting by weaving the yarn through the stitches.
- Requires careful attention to detail to ensure a smooth, even join.
- Whip Stitch:
- A basic and versatile seam that is easy to execute.
- Involves stitching around the edge stitches to join pieces.
- Can be done on the wrong side or the right side, depending on the desired look.
- Crochet Slip Stitch Seam:
- Uses a crochet hook to slip stitch through the edges of the pieces being joined.
- Creates a visible ridge on the inside of the work.
- Offers a neat and slightly stretchy seam.
- Running Stitch:
- A simple seam that involves passing the needle in and out of the fabric.
- Not as strong as backstitch but useful for lighter fabrics or temporary seams.
Tips for Effective Seaming:
- Block Your Pieces First: Blocking ensures that your pieces are the correct size and shape, making seaming easier and more accurate.
- Match Up Stitches and Rows: Carefully match up the stitches and rows of the pieces you are joining to avoid puckering or uneven seams.
- Use the Same Yarn: Seam with the same yarn you used for knitting the pieces, if possible, for consistency in texture and stretch.
- Tension Matters: Keep the tension of your seaming yarn consistent with the tension of your knitting to ensure a uniform appearance.
- Seam on a Flat Surface: Lay your pieces out on a flat surface while seaming to keep everything aligned properly.
By using these techniques and tips, you can achieve professional-looking seams in your knitted projects.
Imaginary seam knitting garments in the round
Sometimes, for easier blocking, you would want to have an imaginary seam on the sides. To achieve that makes a purl stitch row on both sides. It will be almost invisible but will let you know where are the sides of the garment.
Increases or Decreases
You can make decorative decreases/increases on the side of the body. To achieve that, step back 3-4 stitches from the side seams and make a decrease or increase. In my work in the progress, I used this knitting hack.

Picking Up Stitches Correctly
In perfect stockinette knitting world, your gauge should be close to 0.75. What is this magic number? It is a golden ratio between stitches and rows per 1cm (or Inch). The closer you are to this number, the easier it is in picking up stitches. Because you won’t have to think too much – pick up 3 stitches over 4 rows. That simple!


What if I am too far away from this gauge? Then you will have to recalculate accordingly.
Step 1. Measure the height (rows) in inches or cm (let’s say 10cm=25 rows).
Step 2. How many stitches you have in 10cm? Assume 15 stitches.
Answer: I need to pick up 15 stitches over 25 rows.
SLEEVE & UNDERARM SOLUTIONS
Set-in cap sleeve knitting pattern
I understand why seamless knitting is so popular these days. Many knitters don’t enjoy seaming, and seamless knitting is a great option to avoid any kind of seaming. This hack will be useful for those who like seaming pieces together but never get a set-in cap sleeve in the right shape. I have a detailed article about set-in sleeve calculation, which turns out great every time. Read an easy set-in sleeve pattern, and you will get it right the first time.
Also, I show you how to get a smooth decrease line.
Preventing Underarm Holes
This hack is for a raglan sweater. After separating for sleeves and body, a gap will develop on both sides of the underarms. These could be smaller or bigger holes, but 100% you will get them because stitches get stretched. These issues are easy to fix on the go without sewing those holes after finishing. How? Read here – how to divide for sleeves and body!
Sleeve Increase Formulas
Do you hate too many calculations in knitting? This hack will help you!
There is a consistent pattern for sleeve increases (same for decreases), considering you take average yarn weight and needle size.
- If the length of the arm is 52-60cm (20.4” – 23.6”) at normal fullness increases are in every 6th row.
- Length of the arm is 48-51cm (18.9” – 20”) at normal fullness then increases are made differently once 6th row and after 4th row alternating increases every 6th and 4th rows.
- If arms are short and full 48-51cm (18.9” – 20”) then increase every 4th row.
In case you get the desired amount of stitches but didn’t get the right length, then continue knitting another 5-6cm (2 inches) without increases until the desired length. Remember to write it down and knit the second sleeve the same way.
Learn To Read Knitting Charts
Knitting charts are easier to understand how the stitches work together to form a pattern. You will save a lot of time once you get familiar with knitting chart reading. Here is the knitting chart guide.
These are all my knitting hacks for today, I am sure I will share more. But hey! Do you want to avoid these beginner knitting mistakes?
