Last updated on March 20th, 2026 at 10:28 am
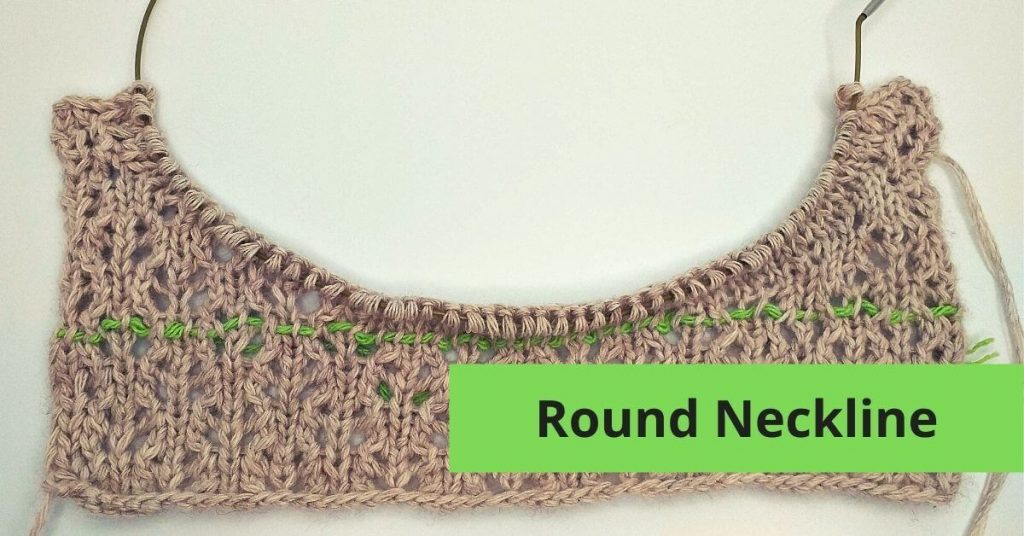
What a relief! We’ve all experienced it, knitting a neck hole – it seems impossible to get the desired shape: either it is a square or way too triangular. I’ve been there. And then I figured out a way to do it.
Disclaimer. Please note that some of the links on this blog are affiliate links, and I may earn a small commission if you purchase products through them. Your support through these links helps sustain this blog and is sincerely appreciated. Rest assured, I only recommend products I believe in.
I rarely follow ready-made patterns. This is a lesson on how to knit a neck hole for beginners.
Imagine that you are given a task to create a cardigan with an open-work pattern and round neck hole (crew neckline). If your knowledge of knitting does not go beyond basic stitches, you might have some problems.
You will learn basic principles and apply in your own designs. Let’s try to figure it out.
Spoiler alert: How to shape a round neck in knitting hack revealed in step 6 where I explain how to decrease!
I discovered the key is in both the decreasing technique and choosing the right materials. Lightweight yarn with defined stitches helped to learn and practice round neck hole. GISIMO 100% Merino Wool Yarn, a soft and luxurious yarn crafted for delicate designs, worked wonders in creating a beautiful crew neckline. Also, if you haven’t tried knitting on circular needles, you should really give it a go! And a handy sewing set is always a good idea to have!
Measuring for a Round Neckline
Before we pick up our needles, we need two core dimensions: Width (how wide the opening is across) and Depth (how low the neckline sits).
1. Neck Circumference
First, measure around the base of your neck.
Example: My neck circumference is 38 cm (15″).
We use this number to calculate the Width (the horizontal distance across the neck hole).
2. Neckline Depth
This is the vertical distance from the highest point of your shoulder down to where you want the “U” of the neckline to rest.
Standard Depth: For a classic crew neck, the minimum depth usually starts at 7–8 cm (2.75″–3.15″).
Pro Tip: If you want a deeper scoop, simply increase this measurement!
3. Converting to Stitches and Rows
Once you have these measurements in centimeters or inches, we need to “translate” them into knitting language. This is where your knitting gauge comes in.
Width is converted into stitches.
Depth is converted into rows.
Ready to start the math?
Now that you have your base measurements and your gauge swatch ready, let’s head to the next step: The Calculations. I’ll show you exactly how to turn these centimeters into a step-by-step knitting plan.
How big should the neck opening be?
Before you start knitting, you need to make sure the opening is large enough to actually fit over your head! A neck hole that is too small is a common mistake that’s hard to fix later.
A good rule of thumb for the minimum circumference of the finished neckline (including the ribbing or edges) is:
(Head Circumference + Neck Circumference) / 2 = Minimum Neck Hole
For example, using my measurements: (56 cm + 38cm) / 2 = 47 cm (18.5″)
This 47 cm is the absolute minimum. If you want a looser, more relaxed fit, you can certainly add a few extra centimeters to this number.
Expert Shortcut: If you aren’t a fan of math, just grab your favorite store-bought sweater, lay it flat, and measure that neckline. It’s the easiest way to find a fit you already know you love!
Once you’ve settled on your target circumference, the real fun starts—turning those numbers into stitches!a
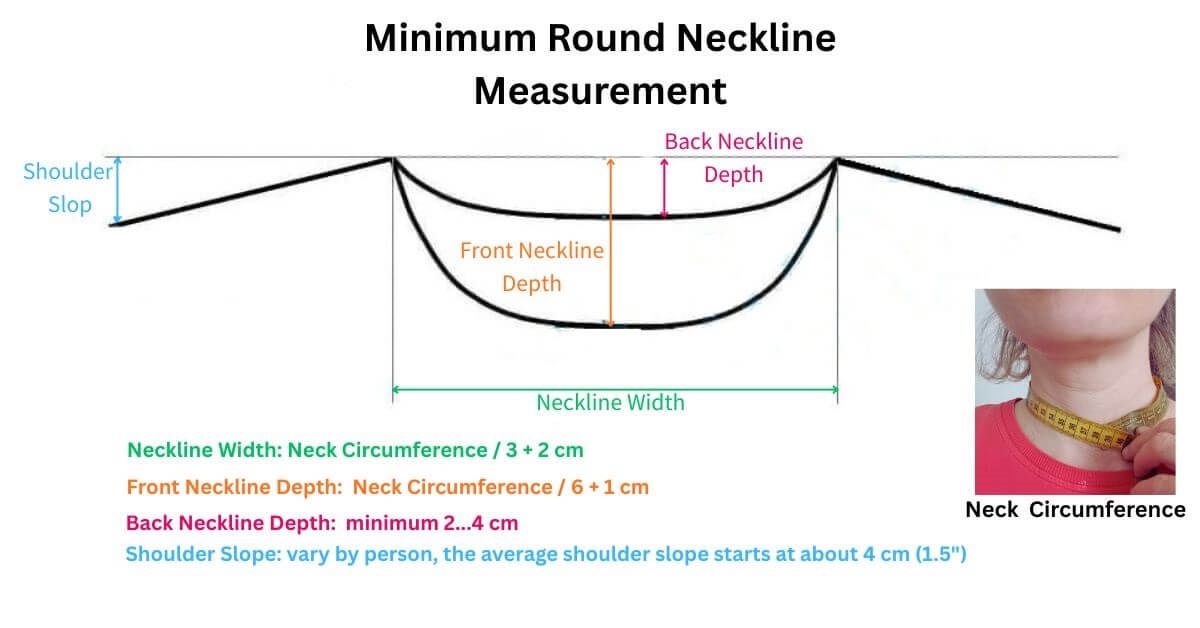
Calculated Measurements for a 38 cm (15″) Neck
To find your starting point, apply these formulas to your own neck circumference. Please note: these results represent the absolute minimum for a standard fit. For a more relaxed, comfortable neckline, I recommend adding 1–2 cm (1/2″) of ease to your final width and depth results.
Neckline Width: (Neck Circumference / 3) + 2 cm
My Calculation: (38 cm / 3) + 2 cm = 14.7 cm (5.75″)
Front Neckline Depth: (Neck Circumference / 6) + 1 cm
My Calculation: (38 cm / 6) + 1 cm = 7.3 cm (2.85″)
Back Neckline Depth: Standard range is 2 cm to 4 cm (3/4″ to 1.5″)
My Choice: I use 3 cm (1.25″) as a balanced middle ground.
Shoulder Slope: Standard average is 4 cm (1.5″)
Note: This is the industry average. If you have straighter shoulders like mine, you may prefer to use 2 cm (3/4″).
A Note on Ease
The measurements above are designed to follow the lines of the body closely. If you prefer a looser “scoop” or a wider neckline that feels less restrictive:
For the Width: Add 1.5 cm to 2 cm to your result if you want the neckline to sit further away from the neck.
For the Depth: Add 2 cm or more if you want a lower, more relaxed front opening.
Always Check: Ensure your final circumference (Width + Depth) is at least as large as your “Head-Fit Safety Check” number!

How to Shape a Front Round Neckline
Shaping a neckline is essentially “sculpting” a curve out of a rectangular piece of knitting by decreasing stitches in a specific pattern.
Knitting Tip: Before you start the neckline, add a lifeline! If you make a mistake in your shaping, a lifeline allows you to safely unravel back to the exact row where the neckline began.
1. Identify Your Target Numbers
First, you need to know how many stitches you are removing and how many rows you have to work with.
Total Width: 41 stitches
Total Height: 24 rows
2. The Center Bind-Off
To start, we leave at least 1/3 of the neckline stitches in the center.
The Math: $41 / 3 = 13.6$.
The Choice: I chose to leave 17 stitches in the center. I did this because I have a repeating pattern I wanted to keep neat. If you are knitting in stockinette, leaving 15 stitches would be perfect.
3. Split the Remaining Stitches
Now, calculate how many stitches are left for the side curves:
$41 \text{ total stitches} – 17 \text{ center stitches} = 24 \text{ stitches remaining}$.
Divide this by 2 (for the left and right sides): 12 stitches per side.
4. Group Your Decreases
To create a smooth curve, we don’t decrease all 12 stitches at once. We break them into groups (usually starting with larger groups and moving to single decreases).
In my case, I split my 12 stitches into this sequence: 3 – 3 – 2 – 1 – 1 – 1 – 1.
This means I will have 7 decrease points per side.
5. Managing the Height (The “Straight Row” Hack)
This is the secret to a professional-looking neckline!
Decreases are worked on every other row (the Right Side). Since I have 7 decrease points, it will take me 14 rows to finish them.
However, my total height is 24 rows.
24 total rows – 14 shaping rows = 10 rows remaining.
The Hack: You must knit those final 10 rows straight (no decreases). If you skip this straight section and spread the decreases over all 24 rows, you will end up with a “V” or “Boat” shape instead of a crisp round neckline.


How to Shape the Back Neckline
The back neckline is much shallower than the front. To achieve that gentle curve, we use a wider center bind-off and fewer shaping rows.
1. Identify Your Numbers
Total Width: 41 stitches
Total Height: 8 rows
2. The Center Bind-Off (The 1/2 Rule)
For the back, we want a flatter base, so we leave about half of the neckline stitches in the center.
The Math: $41 / 2 = 20.5$.
The Choice: I chose to leave 23 stitches in the center to maintain my stitch pattern.
3. Split the Remaining Stitches
$41 \text{ total stitches} – 23 \text{ center stitches} = 18 \text{ stitches remaining}$.
Divide by 2: 9 stitches per side.
4. Group Your Decreases
We want to spread these 9 stitches across our 8 rows. I’ve grouped them as: 3 – 3 – 2 – 1.
5. No “Straight Rows” Needed
Unlike the front neckline, the back doesn’t need a straight section. We want the curve to lead directly into the shoulder seam for a clean, professional finish.

You can play with decrease distribution using graph paper. Or, use a computer software. All the calculations I draw in Stitch Fiddle. It is free for most basic stuff.

In the video, I show how to shape neckline using short rows. Also, explaining round neck hole shaping in lace pattern and things to consider when it is not plain stockinette.

Frequently Asked Questions about Knitting Necklines
Adjust neckline size by altering the number of stitches decreased or bound off centrally, and the number of rows you work for shaping. More stitches/fewer decreases create wider/deeper necks; fewer stitches/more decreases make them tighter/shallower. Always use a gauge swatch for accurate calculations.
Yes, why not. You can use straight needles, but only 2 will not be enough. Like in the sock or hat knitting, use 5 straight knitting needles to knit tubular shapes.
To pick up stitches evenly, aim for one stitch per horizontal stitch (bound-off edges) and 2-3 stitches for every 3-4 rows (vertical edges like side shaping). Insert your needle under both strands of the edge stitch for a neater look, and maintain consistent tension to avoid gaps or puckering.
Flaring (too loose) or puckering (too tight) usually comes from picking up an incorrect number of stitches or inconsistent tension. For flaring, pick up fewer stitches or use a smaller needle for the neckband. For puckering, pick up enough stitches and ensure the neckband isn’t too tight. A stretchy bind-off is also crucial.
Eh, you will not like my answer… nothing new here, I always do gauge swatches and it saves me a lot of time later. Always start with an accurate gauge swatch of your chosen yarn and needles, blocking it as you would the finished garment. Then, use your swatch’s stitches per inch/cm and rows per inch/cm to recalculate the exact number of stitches and rows needed to achieve your desired neckline dimensions, adjusting decrease frequency accordingly.
Knitting round neckline doesn’t strictly require circular needles; you can achieve the same results using straight double-pointed needles (DPNs), often called sock needles. If your neckline circumference is less than 60 cm, a standard set of five 20 cm needles is perfect because you can distribute the stitches across four needles to form a circle, using the fifth as your working needle to knit in the round. For larger projects, you may simply need to add more needles to the “circle” to prevent stitches from slipping off the ends.
What finishing techniques work best for a round neckline?
Several finishing techniques can create a neat round neckline. The most common involves picking up stitches around the neckline edge and knitting a ribbing (e.g., 1×1 or 2×2 rib) in the round, then binding off with a stretchy method (like a tubular bind-off) to allow it to pass over the head. Other options include:
Rolled Edge: Simply knitting a few rows of stockinette after picking up stitches can create a naturally rolling edge.
I-Cord Edge: A small, decorative I-cord can be worked directly onto the neckline edge for a clean, corded finish.
Garter Stitch Edge: A few rows of garter stitch will create a flat, non-rolling edge. The choice often depends on the garment’s style and desired aesthetic.
Conclusion
In fact, the round neck is one of the most popular cut nowadays, both for men and women. It has a unique beauty of its own and it can look simply stunning in practically any style of clothing.
There is no need to be afraid to experiment and try something new. Learn some basics of knitting, or at least the basics of how to make a knit round neckline and get creative with it.
You might like:
Pingback: Free Men's Neck Warmer Knitting Pattern: Cozy Up Your Winter Style!